Showing posts with label How To. Show all posts

Sunday, March 18, 2012

A-hem!


Most skirts that I buy tend to be of the granny length, cost one dollar, fray and then get thrown out. One day this all changed via the discovery of the most striking floral skirt I had ever laid my eyes on. Since I was home for a few days celebrating my birthday, I asked my mom to help me hem this special skirt (since it was unnaturally long). I feel as though hemming is a lost art and even though this may be a skill that some of you are familiar with, I know that it took me 23 years to learn it, and maybe I can expedite this process for someone else! Also, feel free to share any tips that you may know on hemming with us, we would love to hear them!


  Step 1.) The skirt was very long and already had an existing hem that was done by hand so we cut off some of the excess to make it easier to work with. We turned the skirt inside out (to allow pen markings) and measured up 6 inches from the bottom of the skirt making  marks along the way to assist in creating a straight cut. This cut is very important since future measurements will be taken using the bottom of the skirt as a guide.


Step 2.) After cutting off the excess, I then tried on the skirt to pick a proper non-granny length. I folded the skirt bottom up to match the length I wanted and placed a few pins to hold the fold so I could remember where it was when I took the skirt off!


Step 3.) Turn the skirt inside out once again and pin all the way around the skirt to match the fold length you made while wearing the skirt. Be sure to measure from the bottom as you are pinning to keep a uniform length.


Step 4.) Sew along the hem using a similarly colored thread. This was the part I was unsure about prior to my momma showing me, and I am glad that she was there! The trick is to go through all of the fabric from the fold and then sew through only a few threads from the inside of the fabric to connect it. You never want your needle to go through to the front of the skirt and you literally only need to attach it to a few threads.

You can see in the picture above that the needle literally only goes through a few pink threads from the inside of the skirt.


Step 5.) Continue sewing around the skirt to finish the hem! And rock what your momma hemmed ya!


-Kay

Monday, March 12, 2012

At home beauty tips!


I am always on the hunt for at home skin tips! I recently stopped in at Heaven and Earth Salon and Spa, in Pottsville, PA. I got a chance to sit down with my favorite skin specialist Helene, the Spa Director at Heaven and Earth. I have been going to Helene since high school, and she has always been so sweet to help me out!  She answered some of my questions, and offered some fun tips!

Facials
Whole Milk + Honey
Vegan version (Since I'm not a huge fan of milk!) = Silken Tofu+ Agave Nectar
    -1 C Milk  + 2 tsp Honey/ Agave Nectar
    -I left on for 10 minutes! Then, rinse off with warm water!

Scrub
Steel cut oats + Water
    -1 C steel cut oats + 1 C water
    -Scrub gently into skin.  Rinse off! (This is perfect to use on legs as well to get rid of winter dryness!)

Under Eyes 
Chamomile Tea Bags
    -Put two teabags with hot water in fridge overnight, until it reaches a chilly temperature. Wring out teabags and put on eyes for 10-15 minutes.

Pimples
1 tsp Baking Soda + 1 tsp water
    -Dab on pimple before sleep!
    -Also, Helene mentioned putting toothpaste on your pimples as well! This may seem a little crazy but it will dry out the pimple!
Redness on pimples! 
Visine + Q-tip
    -Dab on troubled area!


Extra Face Tips!

  •  Remove any/ and every ounce of makeup off of face at night.
  • Always wash your face at night! (The make up will seep into your pillow and stay there, creating bacteria!)
  •  "Make-up will only look good if your skin looks good!" Taking care of your skin is key!

There you go! Some quick tips with at- home items!
A little bit about our friend Helene! (Featured with hair stylist, Bonnie!)


Helene started her beauty journey about 15 years ago! She was going to see Scott (Now, Heaven and Earth Salon and Spa Owner) to get her hair done. Unhappy in her sales and marketing job at Nexxus Hair Products, Scott explained he was starting a salon and spa, he encouraged to her to take classes and become the spa director! She attended classes to be an esthetician and has been at Heaven and Earth ever since! Also! Stop over here at The Painted Ladies for Helene's friend's blog. They offer fun and different eyeshadow, and special makeup tips.


Thanks, Helene!


If you ever get a chance, to go to Pottsville, PA make sure you stop in to Heaven and Earth Salon and Spa! It's right down the street from the wonderful Yuengling Brewing Company! Heaven and Earth is filled with lots of lovely art work, and neat projects. I am truly at amazement every time I go in with all the different art projects that line the walls, and hang from the ceilings!

Love, 
Jillybean

Tuesday, February 28, 2012

DIY Bowtie Flats

Hello!
It's Jillybean, and I am here to bring you a simple DIY to jazz up your flats!
This DIY brought me back to my years as a ballerina. (I admit I wasn't good, but I had fun!) During the later years, split sole ballet shoes were a more serious ballet slipper. But you had to sew your own elastic straps on them! This DIY is kind of the same thing!

Things you need:
1. Pair of flats. (I bought mine at K-mart for 13 dollars!)
2. Pretty fabric (You will need 2/ 8x5 squares + 2/ 1x5 inch strips, I got a half of yard at Jo Ann's for 2.50!)
3. Scissors
4. Leather Sewing needle
5. Sewing Machine
6. Straight Pins
7. Sewing Ruler
8. Thread to match your choice of flats, and your choice of fabric!

1. Measure your elastic across the top of your shoe (with your foot inside!) Cut your strips to your size. (Remember, you are going to want to make this a bit tighter, loose elastic isn't comfortable, or not that great at holding your foot inside!) I wanted a perfect line across my flats with my elastic. So, I marked off with straight pins, and a sewing ruler.  Plus, this gives you a marking for later, when you need to keep the elastic in place.

2. (Dos! Deux! Whatever!) Measure your fabric for the bows. I used a tape measure, to cut out 2/ 8x5 squares. Reason for this: You will cut the fabric in half, and sew the two pieces together! Snip, Snip, Snip! You will also want to cut out 2 strips of 1/5 inches. This will be for your top of your bowtie. 

3.  Prepare your sewing machine! Thread your bobbin, etc. etc! Sew around the edges of your fabric. Make sure they are back to back, on the top side. Sew! Sew! Sew!! 

4. Show off your new sewed pieces to your mom, or get her to hold yours up for you and show them off. (I think my mom was thrilled at how well I picked up using a sewing machine!) 

At this point, you are so close to wearing your new flats out! So take a snack break if you choose or hang out with your lovely furry friend for a second, and carry on! 

5. Get your two piece of fabric to use for your top of your bowtie, and wrap them around your square piece of newly stitched fabric. (Little Jill Note: Fold your fabric over and under like an accordion to create more of a effect, and it also will make it easier to wrap the fabric around.) 

6. After you wrap the two around the fabric, take the pieces to your sewing machine. Sew right across the fabric. 

7. Take your elastic strands, and slip through the back of the bowtie. (Little Jill Note: I sewed a quick x- shape across the back to hold the elastic and the wrapped fabric in place on the elastic strap. But this step is completely up to you!) 


Now! You should have two elastic straps with bowties attached! Cute right!?
8. Thread your special leather sewing needle, and acquire your thimble. Keep your straight pin in the side of the shoe as long as you can to prevent the elastic from slipping, and not making a straight line. 

Repeat on the other shoe, and boom! A totally new flat!
Feel free to perfect your dance moves like myself or just wear them out!  Hehe enjoy!

Happy Crafting!
Jillybean

Friday, February 17, 2012

My All Time Favorite Italian Cookie Recipe


Sew, this being a craft blog and all I am sure it is no surprise to you when I say, I think homemade gifts are simply the best, Especially, when it comes to gifting during a holiday that is about celebrating love! What better a time to gift something made from the heart with that special someone in mind. That being said, as a valentine present I decided to make my valentine one of his/our favorite Italian treats.

Italian cookies are a common treat found in my home at all holidays year round and have been a favorite of mine since I was a lil one. These cookies are absolutely delicious and more than simple and fairly cheep to make (I didn't even have to leave my house to pick up the ingredients). I would say that makes them a great go-to for a last minute bake sale item or pot luck.
*this recipe makes a large batch

Recipe For: Italian Cookies
Prep Time: 20 mins
Bake Time: 10-15 mins
Pre heat oven: 350

Ingredients
Cookies
2 cups of sugar
1/2 lb. of butter (2 sticks, soft not melted)
3 eggs
1lb. ricotta cheese
2 tsp. vanilla
4 cups of flour
1 tsp. baking soda
1 tsp. salt

Icing
1 box powdered sugar
1 stick of butter (soft not melted)
milk

Directions
1.) Mix together sugar, butter, eggs, & vanilla in one bowl.
2.) In other bowl mix flour, salt & baking soda.
3.) Mix bowls 1&2 together. Then add in the Ricotta Cheese mix till blended.
4.) Roll cookie mix into small round balls, place on cookie sheet & bake at 350 for 10-15 mins. (I bake mine for 10-12 for a moister cookie) 
5.) Take out of oven, cool completely then ice.

Icing Directions
stir powered sugar & butter till smooth wile adding a little milk at a time (you dont want runny icing) then add food coloring.


So there you have it, my all time favorite cookie recipe. 
I really hope you and your loved ones enjoy these delicious cookies as much as I do! 
Happy Baking -Mia


40 Ounces Of Koozie

40's, we all love em.. but those lil (or should I say big) buggers, tend to get warm and leave you feeling as if you have no choice but to batten down the hatches and chug one for the team. Luckily, there is an easy and fashionable crocheted solution, known as the koozie!


ch = chain
sc = single crochet


First off, you gotta collect the necessary Richards:
1.) Crochet hook (I used a size E or 3.50mm)
2.) Yarn (Red Heart is always a cheap and durable fave)
3.) Empty 40 oz bottle


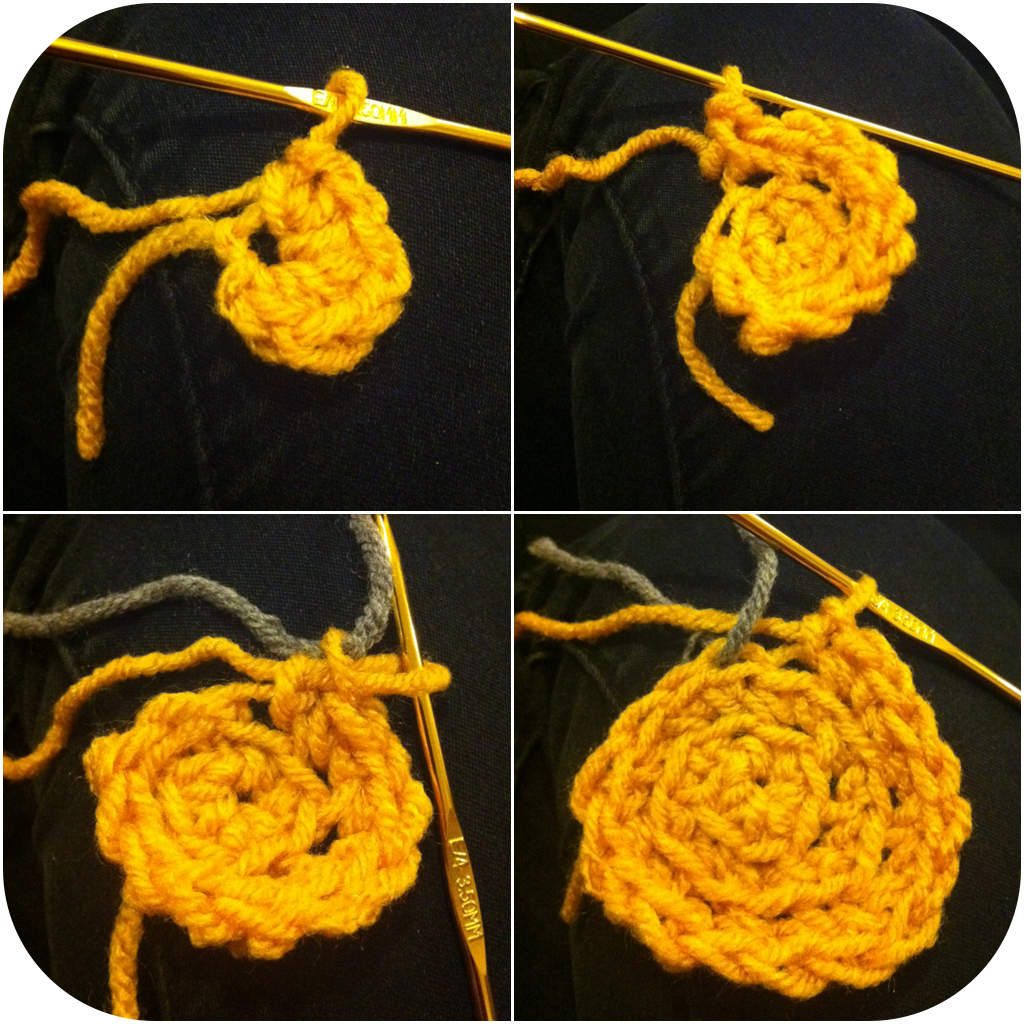
1.) Ch 2
2.) 6 sc in the first ch
3.) 2 sc in each of the 6 existing sc's (you should have 12 sc)
4.) At this point it is helpful to use a piece of contrasting yarn to act as a marker for the first stitch of the next round so that you can watch the office while crocheting and laugh at the hilarity that is michael scott, without losing track of your counting.
5.) For the next round, make 2 sc in the next stitch followed by 1 sc in the next. Repeat this all the way around (2 sc, 1 sc, 2 sc etc..) until you have 18 sc completing that round.
6.) The next round will have 2 sc in the first stitch followed by 1 sc in the next two. Repeat to complete the round.
7.) Complete one more round with 2 sc in the first, and 1 sc in the following 3. Repeat to complete the round.


Now that you have a flat circle, you need a way to make it stand up! This is done by completing one round of sc's and then completing another round of sc's inserting the hook into the back of the stitch causing curvature of the piece (as seen in the picture on top).

The rest is actually quite simple, just continue to single crochet until the koozie is at your desired height!


I decided to add a handle for optimum koozie performance and did so by sc-ing into the base going through the existing stitches(I found that it was easier to do this while the koozie was on the bottle). I made the handle 4 sc thick. After making the first four sc, I then ch 1, flipped directions sc 4, ch 1, flipped directions, etc. I attached the end of the handle through the existing sc's 2 rows from the top of the koozie.

Lastly, I added a contrasting color to brighten up the piece and add some support. With the koozie on the bottle I went through the existing top layer sc's and added a sc to each one as tightly as possible to help keep the koozie from becoming loose at the top.
-Kay